
Neos Microsoft Word Add-in
The Neos Word Add-in allows you to create templates in Word and insert special tags that are replaced with your Needles Neos data during document assembly. This page is for the Word Add-in Desktop only. If you’re looking for the Word Online Add-in, please use the following link
Technical Specifications
Needles Neos Microsoft Word Add-in Current Version: 1.0.7409 (07/23/2021)
Must be a local installation of Microsoft Word for Windows 8+ (not Web version)
Installing the Neos Word Add-In
- Extract the Needles Office Add-in Setup zip file and double-click on the setup.exe file.
[NOTE: If you previously had a Needles Word Add-in installed, remove it before installing the current version.]
Connecting to Neos
After installing the Neos add-in, you should see Needles as a tab option. To connect Word to Neos,
- Click on the Needles tab option to display the add-in ribbon options
- Click on the Log In option in the Settings ribbon group. The Needles Neos login screen will display.
- Enter your login information and click the Log In button.
Insert Ribbon Group
There are three options in the Insert ribbon group to add different types of codes to your Neos merge templates.
- Prompt
- Tag
- List
Prompt
Prompts can be used to request information directly from the user that will populate in the merged document. To create a prompt,
- Click on the Prompt button on the Needles ribbon. The Prompt Details window will display.
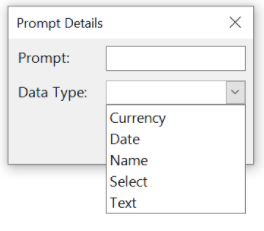
- Enter the instruction or request for information you want displayed to the user. (In this example, the full text is “Enter Prefix, THEN GO BACK TO NEEDLES AND FILL IT IN!!!”)
- Select the Data Type. This will apply the appropriate formatting for the data submitted by the user in response to the prompt. Data types included are Currency, Date, Name, Text.
- Click OK. A merge field is created that will return the fill-in data entered by the user in response to the defined prompt.
[[PROMPT | Enter Prefix, THEN GO BACK TO NEEDLES AND FILL IT IN! | Text]]
Tag
To create tags to bring in data from the Neos database,
- Click on the Tag button on the Needles ribbon. The Insert Tag pane will display on the right.
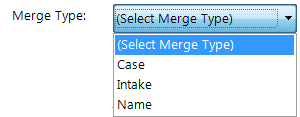
- Select the Merge Type. Merge Types determine the data available from the Category from which you can create tags.
- Select a data group from the Category dropdown. Available tags for the selected group will display in the Tags window. Each Category area will also include Firm and Staff groups to provide tags from those areas of your Neos data.
- If Merge Type = Case, the Category dropdown will display a list of Active Case Tabs.
- If Merge Type = Intake, the Category dropdown will display the Intake information.
- If Merge Type = Name, the Category dropdown will display the Provider information.
- If you wish to include User Defined Data in your template, select the Include User Defined Data check box. A Case Type dropdown will display in the Insert Tag pane. Select the desired Case Type from which you would like a list of available user defined tags.
- If the selected Category has specific data associated by a subcategory, the Subcategory dropdown will become enabled allowing you to select the appropriate subcategory. Subcategories are available in the following areas:
| Merge Type | Category | Subcategory |
| Case | Party | Party Roles |
| Case | Insurance | Insurance Types |
| Case | Value | Value Codes |
| Name | Provider | Provider Roles |
- Use the Search field above the Tags list to quickly find the desired tag. The tag list will be filtered to include tags matching the search text and also ones that relate to those matched items. For example, to find names fields, enter “Name” in the search field. A list of Names tags and the tags for the corresponding names information like Gender, Age, Addresses, Phones, etc.
- Click into the Available Tags list and scroll through the list to find a tag. To insert the tag into the template,
- Double-click a tag, OR
- Select the tag and click on the Insert button.
Example: [[ Total Value |
Case.ValueItems.TotalAmount | LOSTWAGE ]]
List
To create a list of multiple items from a list tab or other area of Neos where there is more than one item, for example list of values, to bring in the data from the Neos database in a table format.
- Click on the List button on the Needles ribbon. The Insert List pane will display on the right.
- Select the Merge Type and Category as explained above for inserting tags. The Category dropdown will display options where there are multiple items. For example, when the Case Merge Type is selected, the Category dropdown will display a list of Active List Tabs in Neos.
- Click into the Available Tags list and scroll through the list to find a tag. Double-click on the desired tag to insert it into the List below that will make up the columns in the list rows.
- Continue selecting the tags for each column of your list table.
- Use the arrow buttons to change the order of the items.
- Use the Add or Delete buttons to add or remove items from the list.
- To insert the List into the template, click on the Insert button. It will look like the below example.
[[ LIST | UserTab2 | Case.UserTab2ListItems.UserDefinedCaseElement.Id.565aa03407084678abcba91200d233e4.Data, Case.UserTab2ListItems.UserDefinedCaseElement.Id.f1ce70db6983433cb515a91200d233ec.Data,
Case.UserTab2ListItems.UserDefinedCaseElement.Id.befaaca43484476f9ff2a91200d233f4.Name,
Case.UserTab2ListItems.UserDefinedCaseElement.Id.a11cee3c2df24686aadca91200d233f5.Data,
Case.UserTab2ListItems.UserDefinedCaseElement.Id.f6bd84e45e4a4efbaf97a91200d233eb.Data
]]
About Needles Office Add-In
Click on the Needles Add-in option on the ribbon About group to see what version is currently loaded. Always update to the latest version.